 Menu
Menu 


Wordpress is a fantastic, user friendly content management system used by millions of websites around the world. But even with that in mind, there are still numerous tips and tricks to getting the most out of your WordPress site. In this article, we’re going to specifically discuss the “posts” feature within WordPress, how to use all the various features of WordPress posts, and how to get the most out of each and every post you write.
The Basics Of WordPress Posts
Wordpress by default uses two main different pieces of content, posts and pages. Pages are generally used for static content, such as an about us page or contact us page, whereas posts will auto populate in the blog index template and are used for on-going content updates such as tutorials, tips, events, news announcements, and blog posts.
In this section, we’ll cover how to add a new post to your blog, what each element on the edit post screen does, what you should write about, how to get organic traffic to your posts, and how to optimize the on-site elements of your post for ranking organically.
How To Add A New Post
 Adding a new post in WordPress is a breeze. Once logged into your WordPress site, navigate on the left column to Posts >> Add New. This will take you to the “Edit Post” screen which we’ll explain more about below.
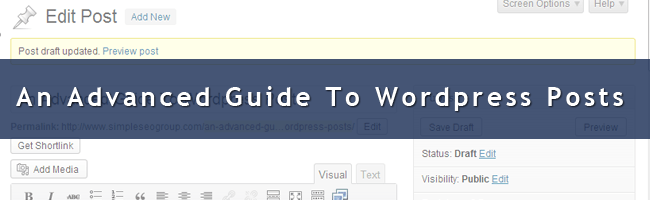
The next screen will be the “Edit Post” screen which is where you can edit all the various elements of your post (pictured below). We’ll now break down each of the elements on the “Edit Post” screen.
")
The WordPress edit post screen (click to enlarge)
Left Side Options:
1) An Advanced Guide To WordPress Posts: This is the title of the post, which by default will populate on the top part of the post and as the title throughout your site (in widgets, sidebars, footers, etc.)
2) Permalink: http://www.simpleseogroup.com/an-advanced-guide-to-wordpress-posts: The permalink is the link directly to the post, which will auto-populate based on the post title. This can also be edited by clicking the “edit” button to the right of it.
3) Add Media: The add media button will open your media library as well as the ability to upload new media. Media are images, videos, or files that you want to insert in the post.
4) Visual vs. Text: The visual editor is a WYSIWYG (What you see is what you get) editor in which what you see in the editor is essentially what will appear when you publish your post. The “text” editor will be HTML based and display the raw HTML/CSS of your page as you format it.
5) Text Editor Controls: The next main area is the text editor. The default text editor consists of the first two rows shown here (we’ll get into why we have additional rows later on in the post). The first row of text editor controls, from left to right, are bold, italics, strikethrough, bulleted list, numbered list, blockquote, align left, align center, align right, insert link, remove link, insert more tag, full screen text editor, show/hide kitchen sink (this will load the second row of buttons). For the second row of buttons, we have a drop down menu for selecting headings, text underline, full alignment, text color, paste as plain text, paste from Microsoft Word, remove formatting, custom characters, indent left, indent right, undo, redo, and help.
6) Text Box: This text box is similar to the text edit screen on Microsoft Word. This is where you will type and format your text.
7) Revisions: Revisions will log any changes you make to the WordPress post, who made the revision, when it was made, and if you click a revision you’ll be able to revert back to a previous state (if needed).
8) Discussion: This allows you to enable/disable comments on the post and trackbacks to the post.
9) Slug: The slug is the link to the post.
10) Author: The author will, by default, be the user you’re logged in is, however if you want to write a post and attribute it to another author on your site you can select that author from the drop down menu.
Right Side Options:
1) Save Draft: This will save your current work on the post without publishing the post.
2) Preview: This will allow you to preview your post on your actual site without publishing the post as a live post.
3) Status: Status allows you to set the status of the post. In our case, it says “draft” because we’ve used the “save draft” button. If you select edit, you can set the status as draft which is a non-public, saved post or as pending review which means a content editor (if used on your site) can then edit the post and know it is ready to be edited by them.
4) Visibility: Visibility by default is public, which means when a post is published it will be publicly view-able, however you can also set a post as password protected in which you’ll enter a password and only individuals with the post password can view the post, or as private in which only users with WordPress login credentials can view the post contents. There is also a checkbox here for “Stick this post to the front page” which will cause this post to be on the top of all posts regardless of if additional posts are published.
5) Revisions: Revisions can be viewed in more detail here by clicking the “Browse” button to browse through revisions for the post.
6) Publish: Publish immediately can be edited to set a scheduled publish date and time for the post. For example, if you write a post but want it to go out next week, you can click edit here to select a future date for publishing the post.
7) Move To Trash: If you want to completely delete a post and move it to the trash bin, this is how you do that!
8) Publish Button: When you’re ready to publish your post, click this blue button. If you set a future date, this button will change to read “Schedule” in which case you’ll want to click that to confirm your schedule. And when you already publish a post, this blue button will change to “update” in which case you’ll want to click update after you make any changes to the post to ensure the changes are saved.
9) Categories: Categories are organizational tools within WordPress to allow you to keep your content organized. As you can see, we have 6 different categories, and depending on the contents of the post we check one or multiple categories to allow the post to show up in multiple parts of the site.
10) Tags: Tags are customized organizational tools. You can type in various tags to help WordPress search know how to find and relate posts of similar topics.
11) Featured Image: The featured image of the post is the “cover image” which is used in prominent locations throughout the site. This should be an imaged which is sized accordingly and represents the overall contents of the post.
What Should I Write About?
Perhaps the number one reason our clients don’t update their blog on a regular basis is because they don’t have enough time, but the number two reason is because they don’t know what to write about.
We’ve written several other posts about how to come up with blog topics, including all of the following:
- How Anyone Can Write Fantastic Blog Posts In 100 Minutes Or Less
- 10 Ways To Brainstorm Blog Topics
- 5 Tips For Effective Blog Writing
Make sure you write about topics you are knowledgeable about and passionate about. Your readers will be able to tell if you truly are an expert in your industry or if you’re just writing a fluff blog posts because you were told to blog often. And you’ll be greatly rewarded for writing high quality content.
How Do I Get Organic Traffic To My Posts?
While many of us blog for the fun of it or for our current site visitors, the vast majority of people who blog are doing it for the organic SEO value. Search engines love high quality, unique content and will rank it highly in results if you do the following:
- Have A Strong Domain: Google has a metric known as PageRank, which is a 0-10 scale of how strong your backlink profile is in the eyes of Google. The higher your PageRank on the homepage of your site, the greater the chance your blog posts (in general) will rank high in search results. To have a strong domain, you need to have a large number of quality links pointing to your website.
- Write On Researched Topics: Just today a client asked me which of 5 topics they should write about. All 5 topics were the same thing, just worded differently in the title and headings. One of these terms had 1,900 searches per month, the other 4 had between 50 and 200 searches per month. We were able to research the topic in depth to identify what variation is most searched for and which term will generate the most organic traffic for our client.
- Write High Quality Content: This is one of the most important. You have to write quality, lengthy, well written content to rank well. Gone are the days of writing 250 words and ranking well. The internet is far more competitive today, and if you don’t write good content someone else will and will outrank you on search engines.
- Promote Your Content: This is where most bloggers not working with an SEO company fail. You have to promote your content on social channels, through link building, through an email list, and through other means in order to show search engines that your content is popular and worth ranking in search results.
Following these 4 tips will help ensure your content isn’t just a paperweight but actually helps drive traffic back to your website through search results.
How Can I Optimize My WordPress Posts On-Site?
There are various plugins available to help in the optimization of WordPress posts, but the reality is after the Google Penguin updates these plugins are worth a lot less as you don’t want to “over-optimize” your post. That’s right, there is an art to optimizing in a post-penguin world and you don’t want your posts to be too optimized or search engines will think they’re artificial and not rank them as high.
The main elements you want to optimize in your posts are listed below, in order of importance:
- Title: The title of the post should describe the post content, be highly researched to identify the right wording, and be what you’re trying to rank for in search results
- URL: The URL should mimic the title, be clean, and be as close to the top level domain as possible in structure
- Internal Links: It’s important to internally link your posts on your site. That means going back in and editing old posts and including links in new posts to interconnect your posts when applicable.
- Headings: Headings (selected from the format drop down menu in the post editor screen) are important in organizing your content and telling search engines what sections are more important. Use headings H2 through H6 depending on how important a heading is (H2 holds more weight than say H3). Your H1 heading should already be hard coded into your theme as the post title, and you only want one H1 per post.
- Content: This shouldn’t fall so far down the list, because even if you do the first 3 things right and have poor content, it won’t rank. But assuming you write good content (which you HAVE to do these days) you should optimize your content by writing naturally yet ensuring you have used the keywords you want to rank for sporadically. There’s no magic number of how many times to use them anymore, just write naturally and use them when it’s natural.
- Tags: Many of our clients were told by other SEO companies that “tags” are some sort of magical ranking formula. Well, this isn’t the case. Tags can help rank for keywords by generating internal links with that tag to your post and by increasing your keyword density, but overall they are pretty low on the ranking totem pole.
More Advanced WordPress Post Options
With the thousands of plugins available for WordPress and as well as custom options available when working with a web developer, there are endless things that can be done to WordPress posts to make them more advanced and customized for your business. While we could go on and on about custom post changes we’ve made for clients, we’ll focus in on three key advanced post options that would be beneficial to most businesses: shortcodes, SEO, and advanced related posts.
Shortcodes:
Shortcodes are predefined pieces of code and text which can be called upon just by clicking a button. For example, if you often use a blockquote area or a testimonial in your blog posts, instead of copying/pasting that code each time you want to use it or worse yet writing out the code, you can install a shortcode plugin to allow you to click one button and have that coding and text on demand.
As an example, below we have an orange box which calls up our “request a free consultation” banner. All I have to do is click this button and it will put this into our post:
Additional shortcodes that we have setup are for formatting, callout boxes, testimonials, alignment, tabs, and more. Virtually any style, layout, or visual element can be turned into a shortcode to save you time when writing your blog posts.
While we’ve experimented with dozens of different shortcode plugins, there isn’t necessarily a one size fits all. The plugin you use will depend on:
- Your current theme: Some themes are not compatible with certain shortcode plugins
- Your current plugins: One of the drawbacks to plugins is that they are developed by different developers and might not work well with one another; make sure a qualified developer is installing your plugins and testing prior to deployment
- Your exact needs: Depending on the number of shortcodes and your needs, there are a variety of different plugins with different features to make things exactly how you need them
We’ve had good success with these three plugins, but remember to test them prior to installing on your site:
- Shortcodes Pro (For custom shortcodes)
- Shortcodes Ultimate (Comes with predefinied shortcodes)
- Shortcoder (For custom shortcodes)
SEO Plugins:
This is always a hot debate in the world of SEO: which SEO plugin is best? When it comes down to WordPress SEO plugins, there are two main contenders fighting for the top spot: Yoast SEO and SEO Ultimate. Personally, I prefer SEO ultimate as I think it is more user friendly to an agency environment, however many of my friends and colleagues at other SEO firms prefer Yoast SEO.
As the end of the day, the plugin doesn’t matter nearly as much as how you use it. It’s important to install an SEO plugin, and if you’re engaged in an SEO campaign with an SEO service provider they should be doing this for you.
There are dozens if not hundreds of different settings that need to be adjusted depending on your exact site layout, structure, and purpose, so I won’t even get into the nitty gritty on what you should be optimizing for your specific site, however as a blanket rule the following should always be optimized for every site and every page/post on the site:
- Title of each post/page
- Meta description of each post/page
- Internal linking to/from each post/page
- Rich markup (if applicable)
- Deindexing of administrative and redundant pages
- 404 monitoring
Advanced Related Posts:
Perhaps one of the most critical things to a website is to ensure visitors stay on your site and flow from page to page. A good way to do this is by having related posts show up at the bottom or in a fly by window when a visitor gets to the end of the post they’re currently reading.
For example, when you’re done reading this post you may want more information about getting a WordPress site if you don’t already have one, so that may be a good related post to display.
There are dozens of different plugins that display related posts, however they all fall into two main classes:
- Automatic related posts which try to automatically display a related post based on what the plugin thinks the article is about
- Manual related posts in which the post editor actually tells what posts are related to what
As you probably already know, we are a big fan of the manual related posts simply because the automatic plugins often get it wrong and no one knows what content is related to what better than the author of the content.
If you aren’t using a manual related posts plugin, an easy way to do this would be just adding a few links at the end of your post saying “If you enjoyed this article, you may also enjoy…”. This will act the same as a plugin. However if you have an aggressive content strategy or a lot of content on your site, it may be beneficial to experiment with a few different related post plugins to make things quicker and easier when compiling your blog posts.
So there you have it — an advanced guide to literally everything there is to know about WordPress posts and how to get the most out of them for your website. If you follow these steps, write fantastic content, and do some off-site promotion/link building to that content, you’re almost guaranteed more traffic to your site and more business. However as you probably already know, this is all much easier said than done, so if you’d like to work with a professional on it to have the weight of much of this off your shoulders then give us a call!